FIELD NOTES / QRACHIC GUIDES

Run a cordless snow blower from first snow to spring

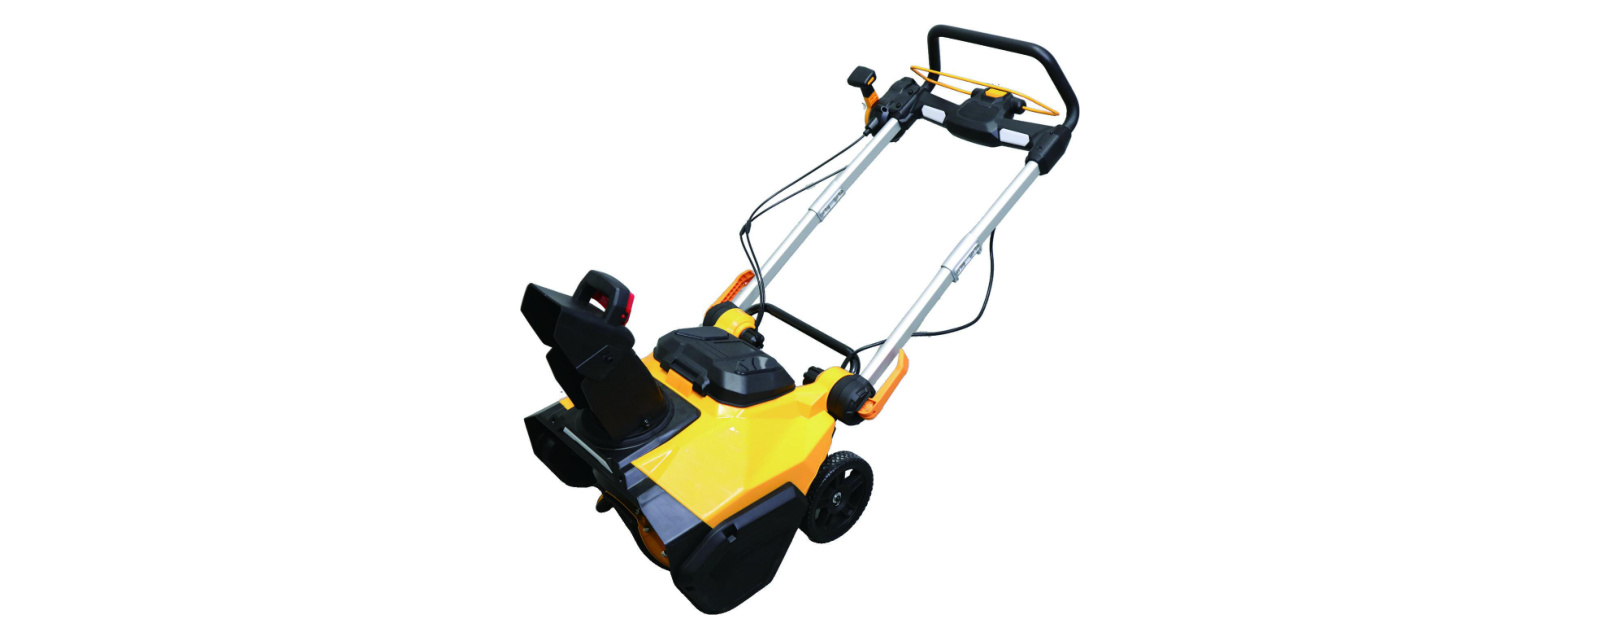
A practical walkthrough of the QS-STE1320-2 20-inch cordless snow blower — assembly, batteries, controls, clearing technique and end-of-season storage. It follows the supplied manual; where the two differ, the manual that came with your machine is the authority.

Run a cordless snow blower from first snow to spring

Before the first snow

Walk the area before you start. Remove wood, cans, wire, rope and other debris from the surface, and check that nothing loose is waiting under the snow — the auger can throw stones a long way. Clear paved surfaces only; this machine is designed for snow, not for frozen, hardened or compacted snow.

Keep everyone except the operator at least 50 ft (15 m) away, and aim the discharge away from people, animals, vehicles and property. Do not work on slopes steeper than 20°, or across the face of a slope.

Wear slip-resistant footwear, gloves, safety glasses and hearing protection, and keep loose clothing and jewellery away from moving parts. Before each use, check that guards are in place, fasteners are tight, no parts are damaged, and the auger stops when the control lever is released.
What comes in the box

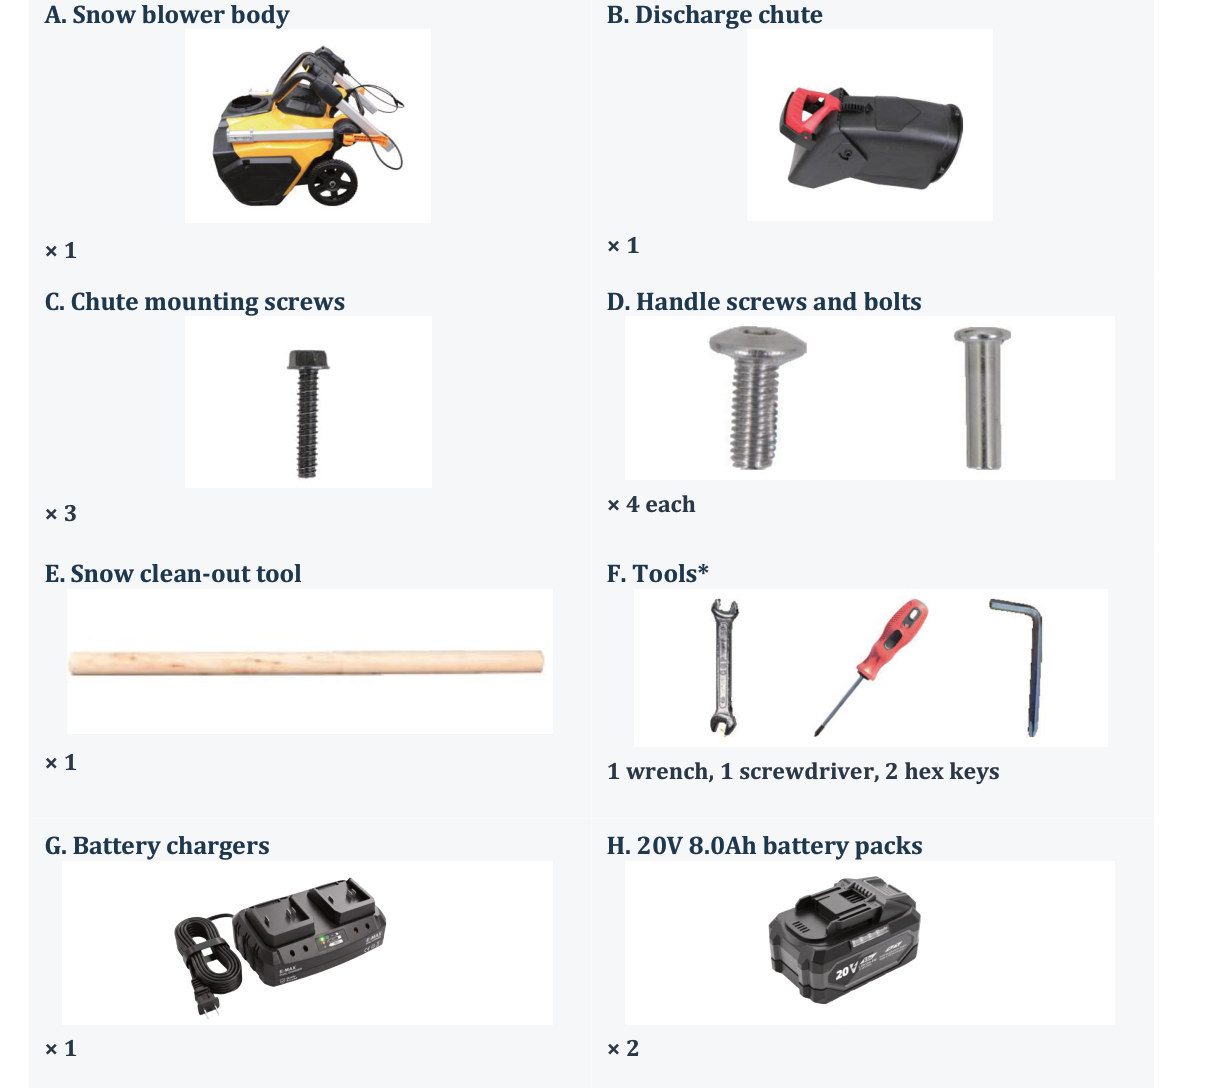
Unpack and check the snow blower body, discharge chute, three chute mounting screws, four long bolts and four short screws for the handle, the snow clean-out tool, a wrench, screwdriver and two hex keys, one battery charger and two 20V 8.0Ah battery packs. Contact support before assembly if anything is missing or damaged.

Box contents A to H: snow blower body, discharge chute, three chute mounting screws, four long bolts and four short screws, snow clean-out tool, wrench, screwdriver and two hex keys, battery charger, and two 20V 8.0Ah battery packs.

Assemble the handle and chute

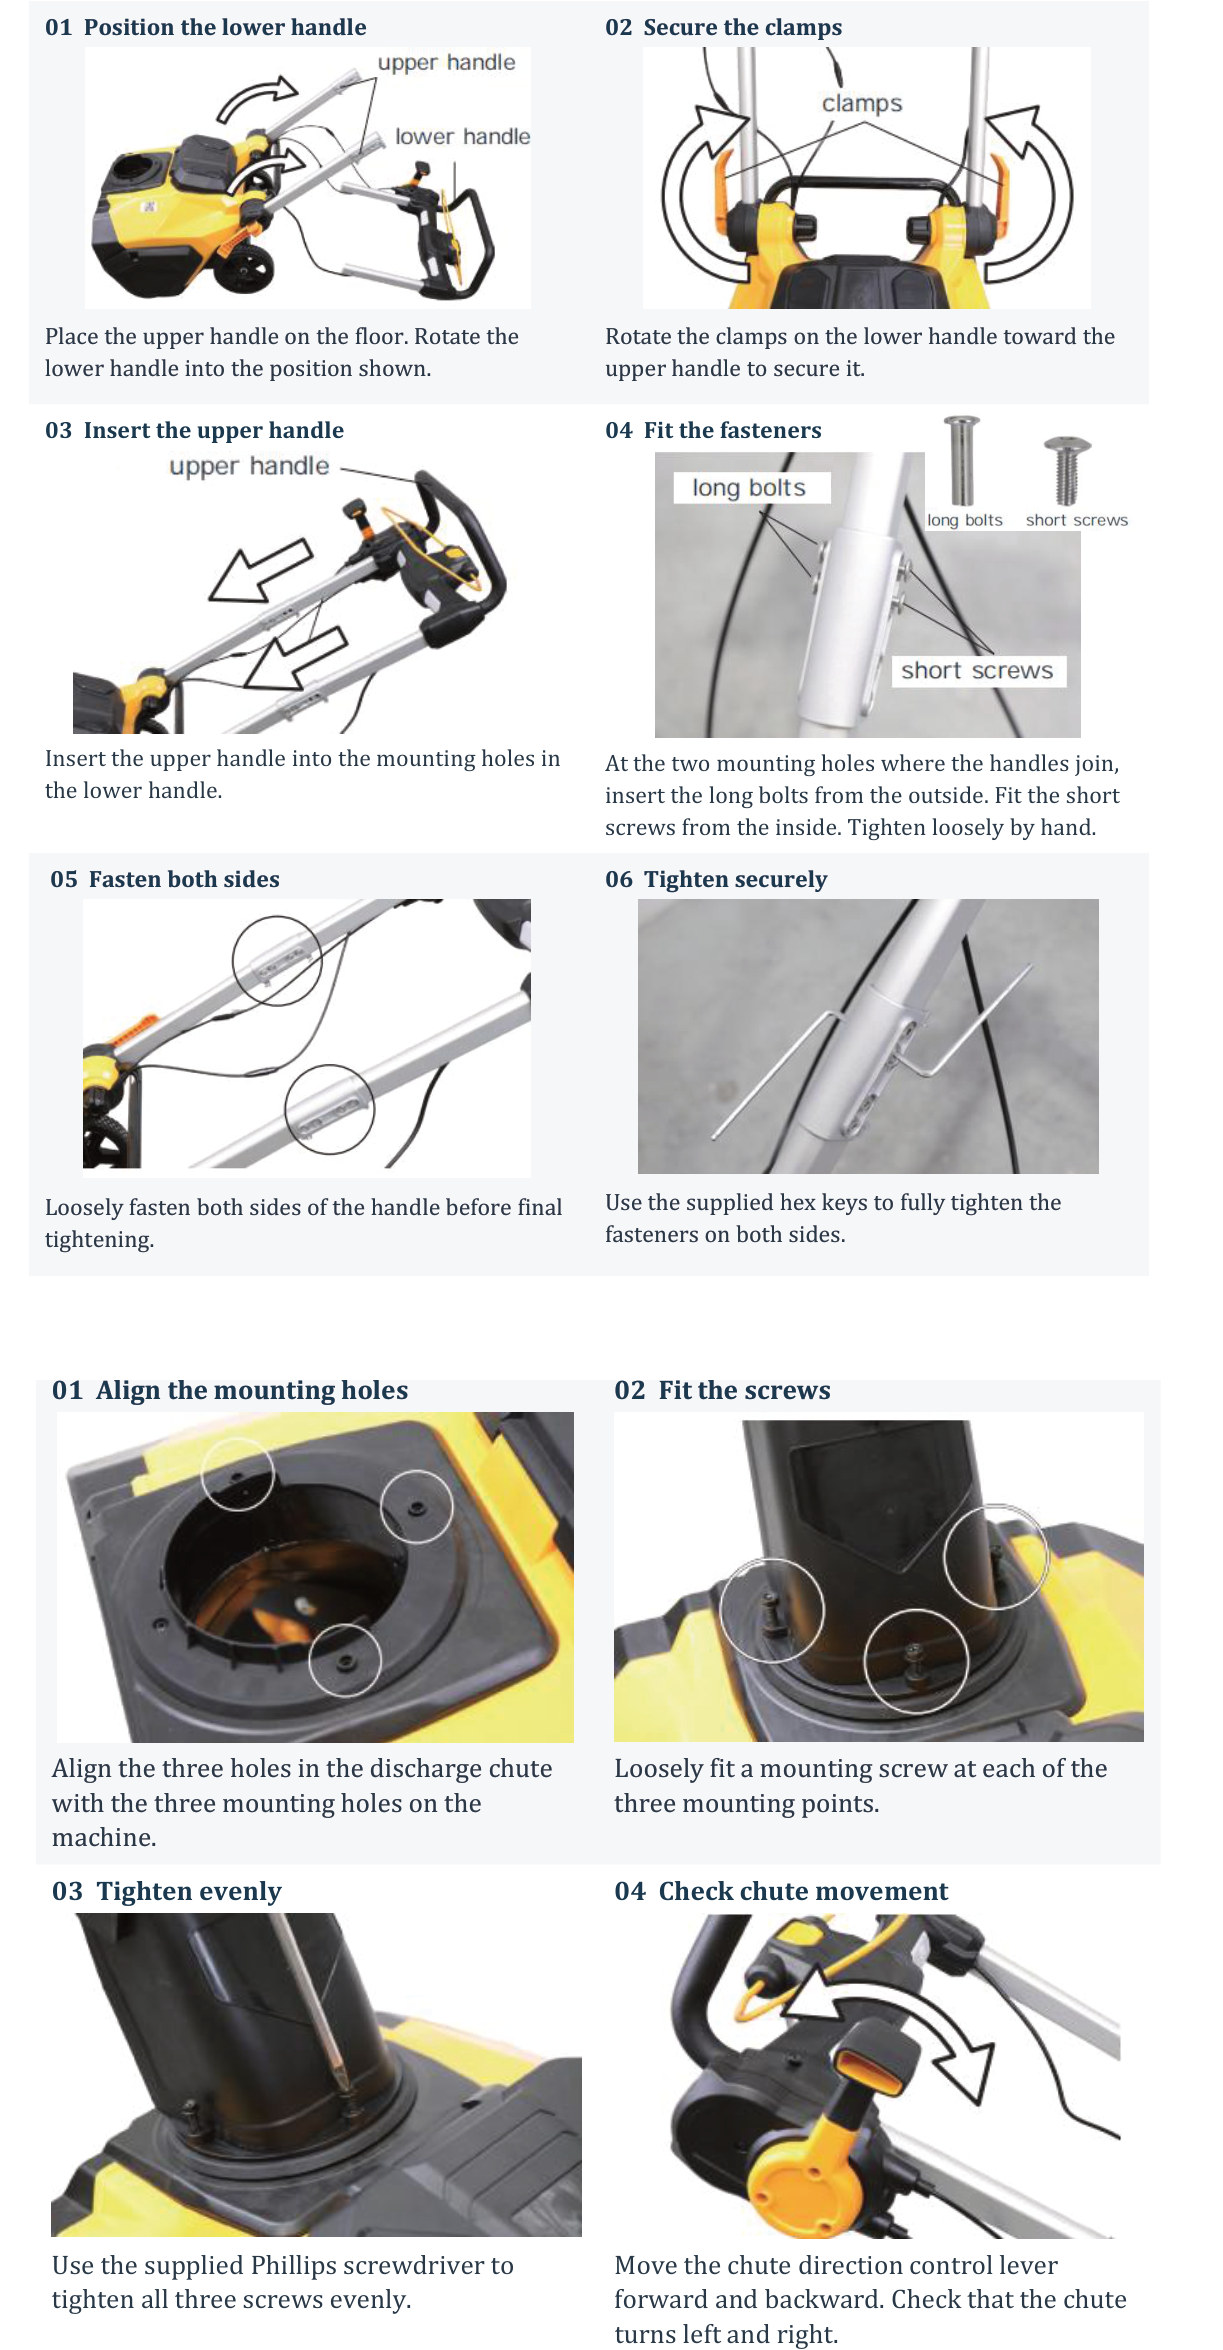
Remove both battery packs before assembly, keep children and animals away, and do not start the machine or pull hard on the cable while you work. Place the upper handle on the floor and rotate the lower handle into position. Rotate the clamps toward the upper handle to secure it, insert the upper handle into the mounting holes, then fit the long bolts from the outside and the short screws from the inside at both joints. Tighten both sides loosely first, then fully with the supplied hex keys.

For the chute, align its three holes with the three mounting holes on the machine, fit a screw loosely at each point, and tighten them evenly with the supplied Phillips screwdriver. Move the chute direction control lever forward and back to check that the chute turns freely and the cable is not pulled tight.

Manual steps 01 to 06: position the lower handle, secure the clamps, insert the upper handle, fit the long bolts and short screws, and tighten both sides. Then steps 01 to 04: align the chute mounting holes, fit the three screws, tighten evenly and check chute movement.

Charge and fit both battery packs

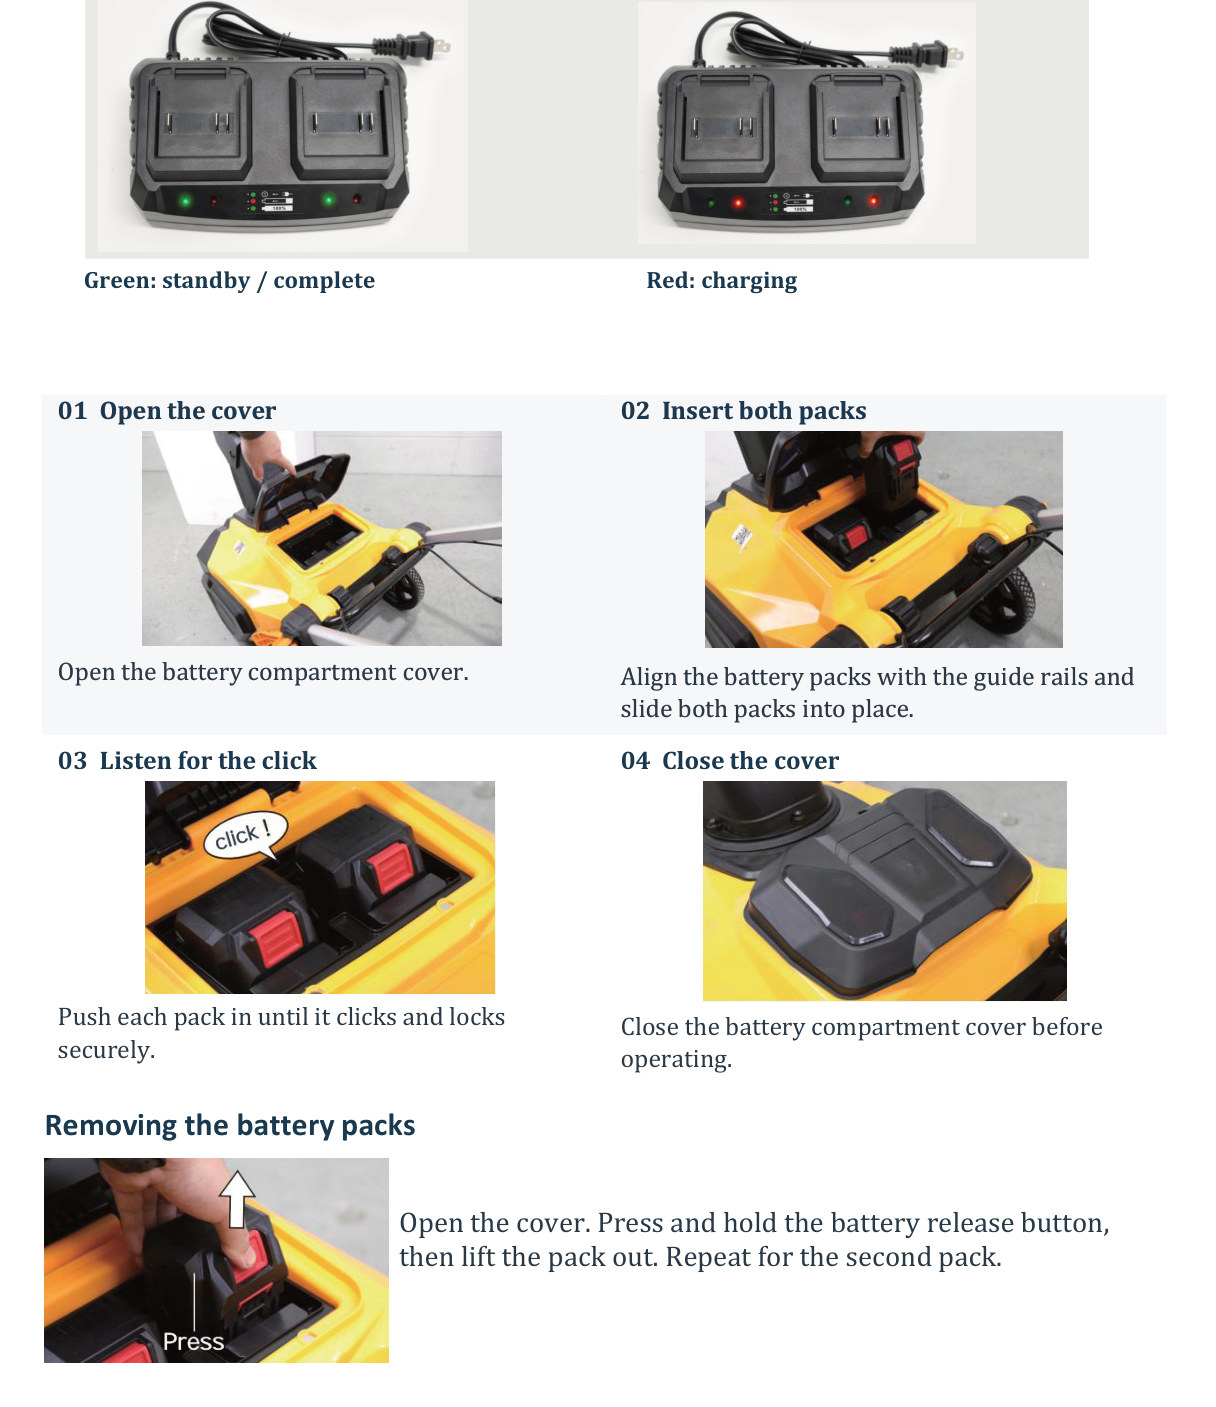
The packs are not fully charged when purchased, so charge both before first use. Plug the charger into a power outlet; the right-hand indicator lights green for standby. Slide a pack fully into the charger along the guide rails and the indicator turns red. Charging is complete when it turns green — about 160 minutes, depending on temperature and pack condition. Remove the pack, then unplug the charger, and press the pack's indicator button to check its charge.

Charge at 32–113°F (0–45°C). Warmth during charging is normal. Recharge promptly after use, recharge stored packs every six months, and never leave a depleted pack uncharged for three months. The pack gauge shows 4 lights for 65–100%, 3 for 50–65%, 2 for 35–50%, 1 for 10–35%, and a flashing light means recharge.

Open the battery cover, align both packs with their guide rails, slide them in until each clicks and locks, and close the cover. The machine will not run on one pack. To remove a pack, open the cover, press and hold the release button, and lift it out — stop the machine and wait for all moving parts to stop first.

Charger indicators: green for standby or complete, red while charging. Manual steps 01 to 04: open the cover, insert both packs along the guide rails until they click, close the cover, then press the release button to remove a pack.

Controls and starting

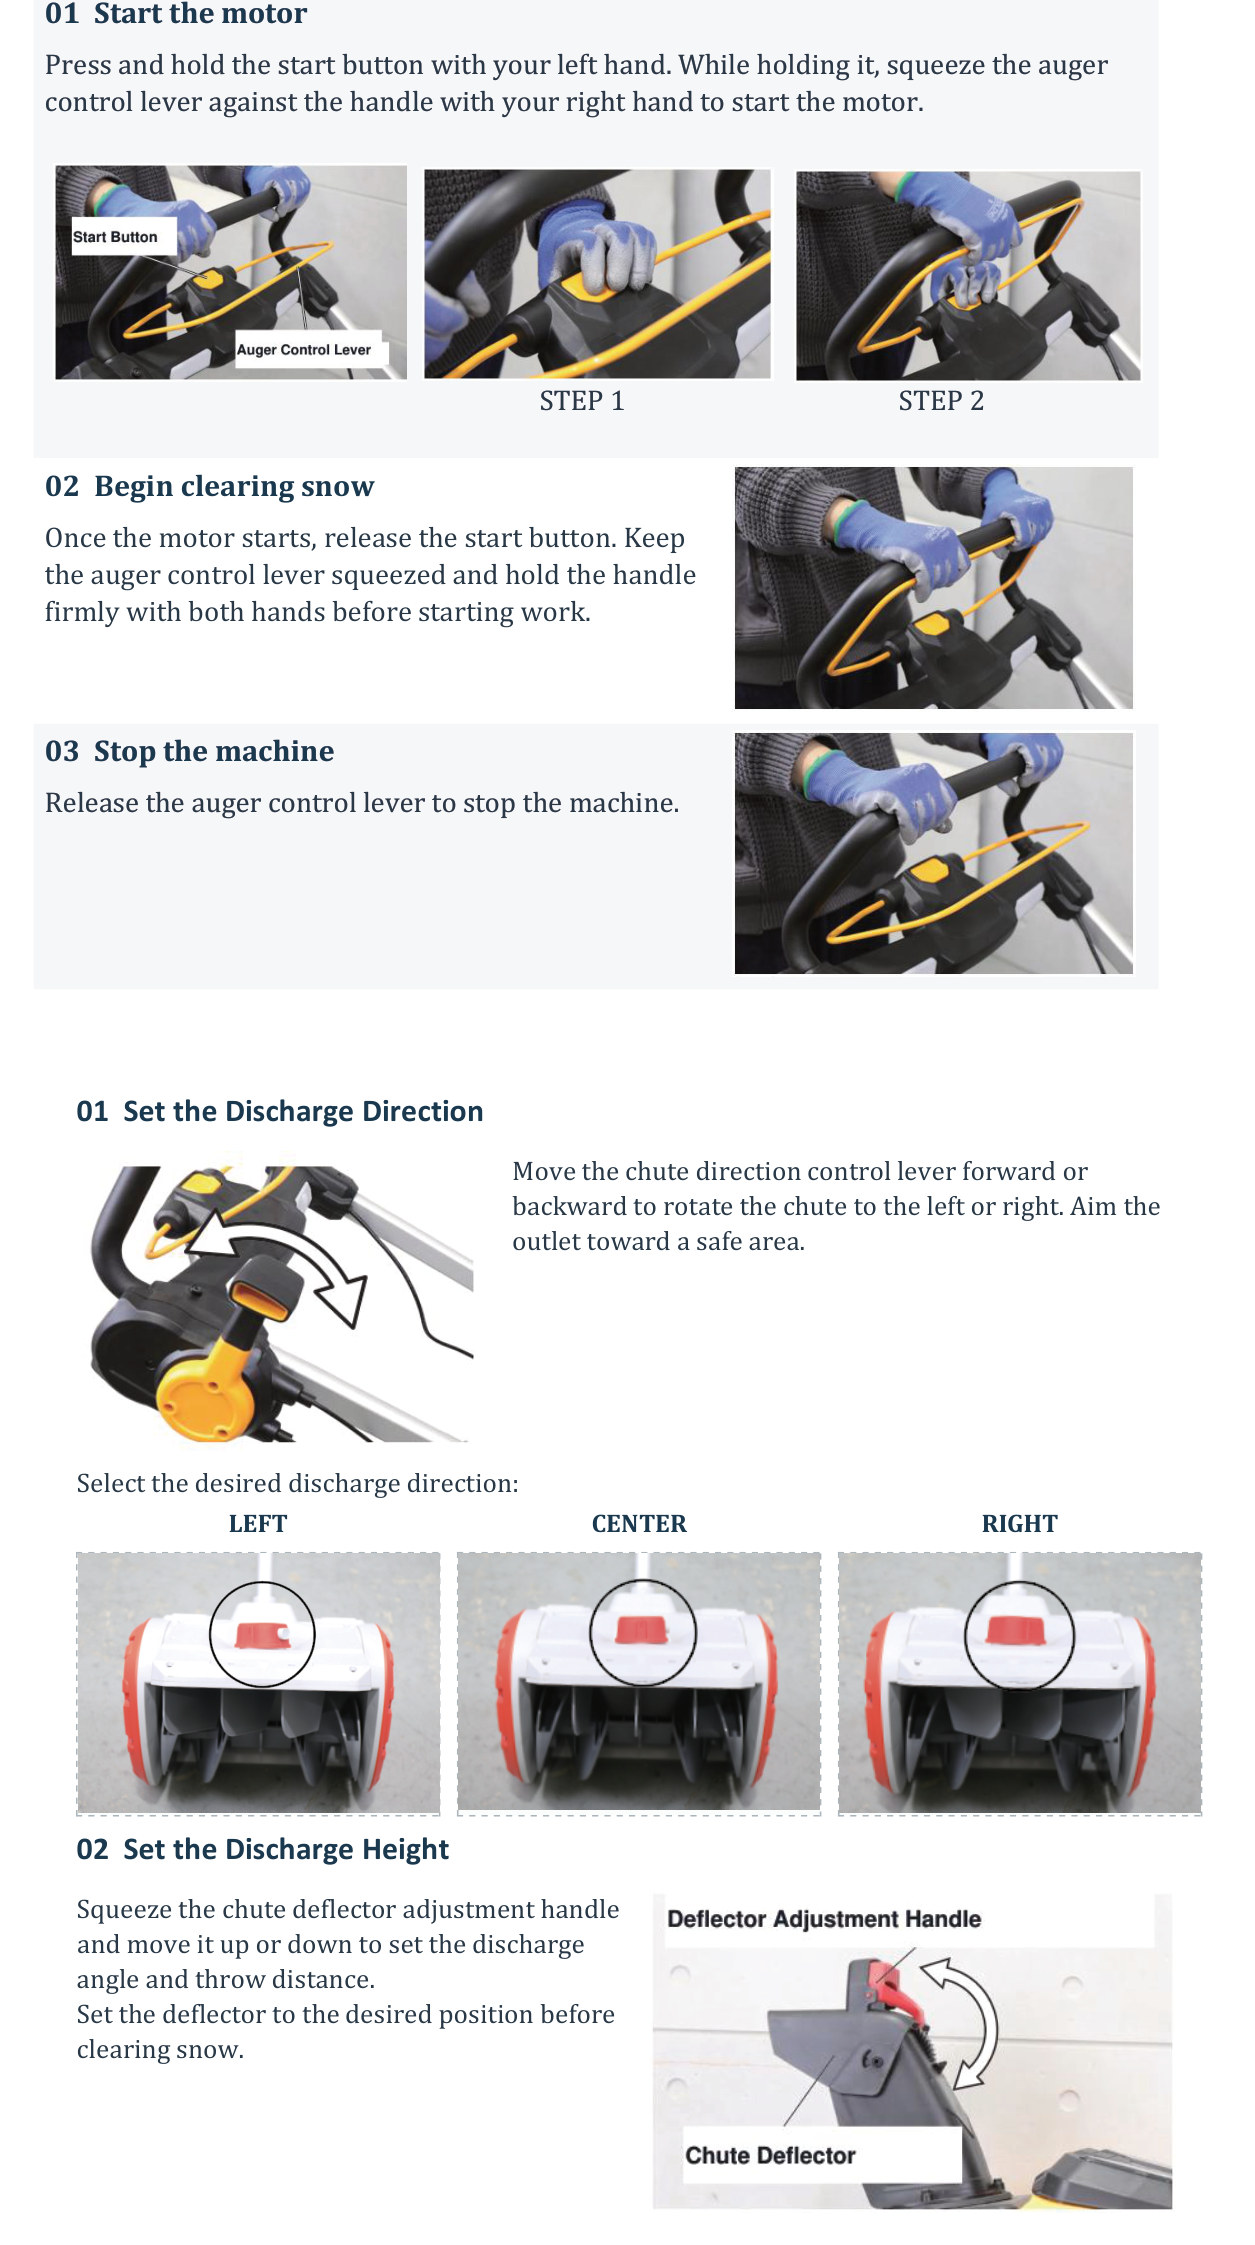
Press and hold the start button with your left hand, then squeeze the auger control lever against the handle with your right. Release the start button once the motor starts and keep the auger lever squeezed; release it to stop. Never tie or clamp the lever in the engaged position.

Move the chute direction control lever forward or back to rotate the chute through 180°, left to right, and set the direction before you start clearing. Squeeze the chute deflector adjustment handle and move it up or down to set the discharge angle and throw distance.

Manual steps for starting the motor with the start button and auger control lever, stopping the machine, setting the discharge direction left, centre or right, and setting the discharge height with the deflector handle.

Clear snow steadily

Clear snow on the day it falls. Snow left for several days may harden or freeze, and this machine is not designed for frozen or compacted snow.

Move more slowly than your walking pace. Pushing too fast fills the auger housing faster than the machine can discharge; if snow starts to build up, pull back slightly and wait for the motor to run steadily before moving forward again. Take narrower passes to reduce the load, hold the handle firmly with both hands, and keep the auger housing on the ground when the machine is stopped, parked or secured for transport.

Stop immediately if snow is not discharged or the motor sounds abnormal — continuing with a blockage or excessive load can damage the belt or machine.

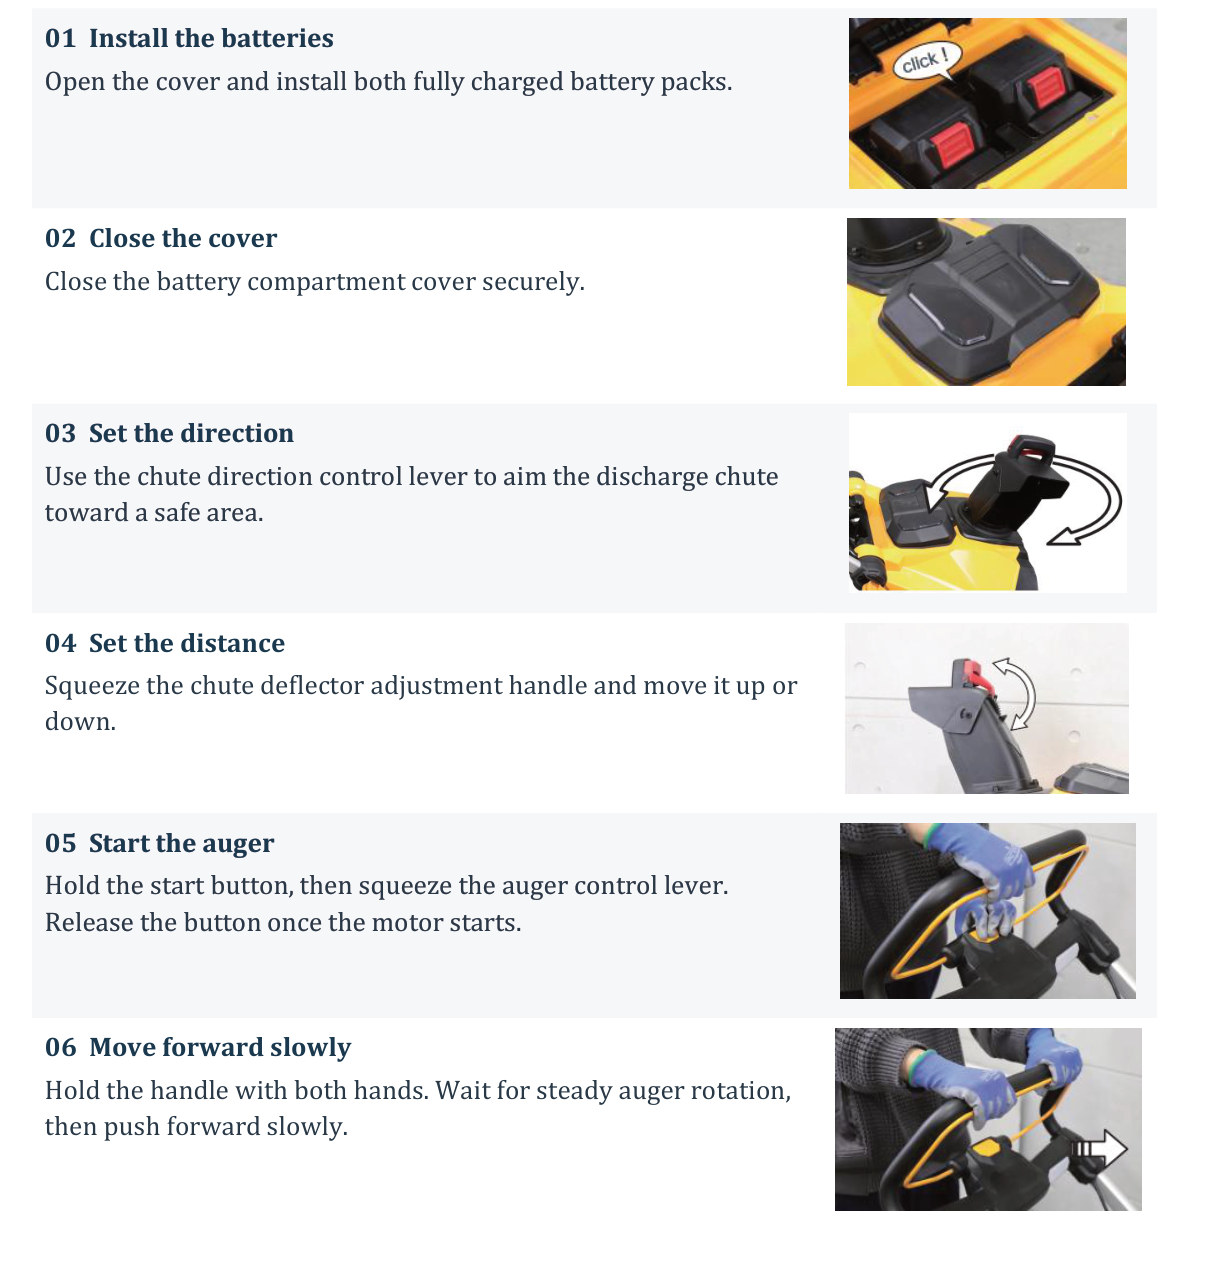
Manual steps 01 to 06 for clearing snow: install the batteries, close the cover, set the direction and distance, start the auger, and move forward slowly with both hands on the handle.

Clear a blockage safely

The rotating auger can amputate hands or feet. Never use your hands to clear the auger housing or discharge chute, and never look into the chute while the machine is running.

Release the auger control lever and wait until all moving parts have completely stopped. Remove both battery packs, clear the housing and chute with the supplied snow clean-out tool, and check that the blockage is gone before refitting the packs and restarting.

If the auger strikes an object or becomes entangled, stop immediately and follow the same sequence. Inspect for damage and do not restart until the machine is repaired.

Cleaning, moving and storage

After each use, release the auger lever, wait for movement to stop and remove both packs. Clear snow and mud from the housing and chute with compressed air or a similar tool, wipe the machine dry, and check for loose fasteners or damaged parts. Store it indoors, dry and out of reach of children.

Do not wash the machine with water or use strong detergents, solvents, alcohol, paint thinner or petroleum benzine on plastic parts — snow or moisture left on the machine may freeze and cause damage.

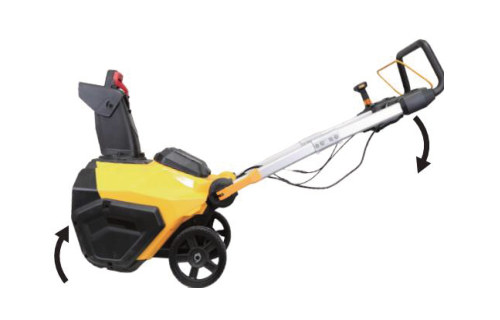
To move the machine, push down on the handle to lift the auger housing and roll it on its wheels. Before transport, remove both packs and secure the machine against movement. At the end of the season, clean and dry it, store the packs separately in a safe, dry place at the specified temperature and charge level, and check them at least every three months.

Moving the snow blower: push down on the handle to lift the auger housing and roll the machine on its wheels.

Troubleshooting

If the machine slows or stops, the battery charge is probably low: stop, remove the packs and recharge or swap in two fully charged packs. Continuing to run on a low pack deep-discharges it and shortens its life. If it slows while you are moving fast, reduce the feed rate, pull back slightly and wait for steady rotation before moving forward.

If debris or a cord becomes entangled, stop, wait for complete movement cessation, remove both packs, clear the debris and check for damage before restarting. If snow is not discharged, stop immediately and follow the clearing sequence. If the motor noise is abnormal or the load excessive, stop and check for a blockage or excessive snow feed.

For extended work, let the machine rest for about 15 minutes between extended operating periods. If a problem persists, contact the retailer or an authorized repair service.

Specifications

The model is QS-STE1320-2: a 40V (20V + 20V) brushless machine with a 1,300 W motor, 2,100 rpm no-load speed and manual push drive. It clears about 20 in. (508 mm) wide and 10 in. (254 mm) high, with 180° chute rotation, a throw distance of about 5–30 ft (1.5–9 m) and a deflector angle of 48° ± 3°. The iron and rubber auger measures 15.7 × 6.8 in. (400 × 172 mm), charging takes about 160 minutes, noise is 71 dB, and the machine weighs 41.9 lb (19 kg) without batteries. Overall dimensions are approximately 21.7 × 46.9 × 38.4 in. (552 × 1,190 × 975 mm), with IPX4 water ingress protection.

These are approximate values that vary with operating conditions and battery condition; specifications may change without notice.

Shop the 20-inch snow blower

Scroll to Top