FIELD NOTES / QRACHIC GUIDES

Run a 12-inch cordless snow shovel from first snow to spring

A practical walkthrough of the QS-ESS20W12 12-inch cordless snow shovel — assembly, batteries, controls, clearing technique and end-of-season storage. It follows the supplied manual; where the two differ, the manual that came with your machine is the authority.

Run a 12-inch cordless snow shovel from first snow to spring

Before the first snow

Walk the area before you start and remove doormats, cords, stones, toys and boards — the auger can throw hidden objects a long way. Check the auger, scraper bar, guards and fasteners before each use, and clear snow only; the shovel is not built for gravel, ice or hard-packed snow.

Keep children, pets and bystanders well clear, and aim the discharge away from people, vehicles and windows. Wear close-fitting clothing, gloves and slip-resistant footwear, secure long hair and loose clothing, and keep hands and feet away from the auger housing while the machine is running.

Stop immediately if the tool vibrates abnormally, makes an unusual noise or stops discharging snow.
The shovel at a glance

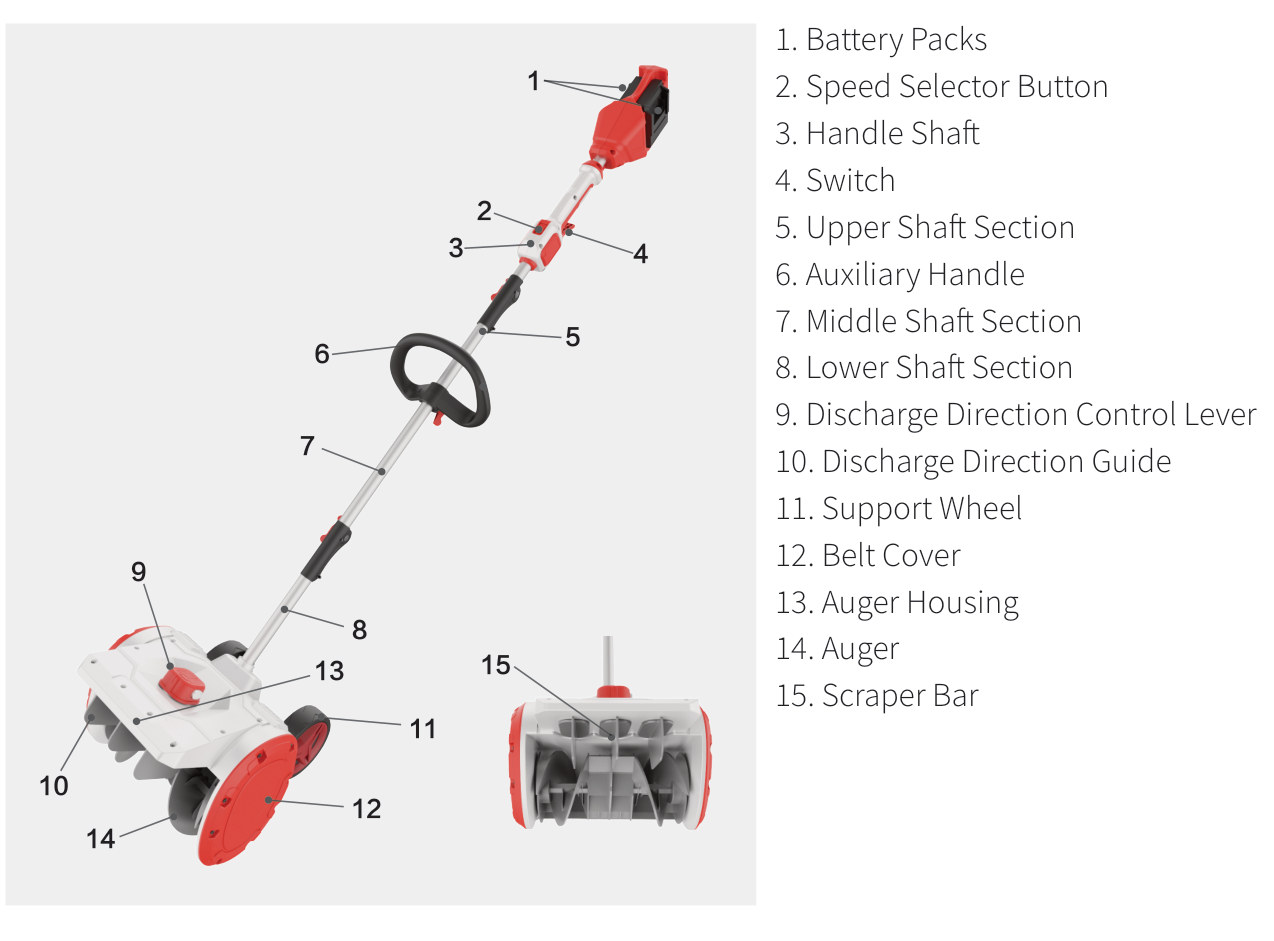
The QS-ESS20W12 is a 40V (20V + 20V) brushless snow shovel with a 12 in. (305 mm) clearing width and a 6 in. (150 mm) clearing depth. The numbered drawing shows every part you will meet in this guide: the two battery packs in the handle, the speed selector and switch, the three shaft sections and their connectors, the auxiliary handle, the discharge direction lever and guide, the support wheels, belt cover, auger housing, auger and scraper bar.

It throws snow up to 23 ft (7 m) in the direction you set, turns the auger at 2,000 rpm and weighs 14.3 lb (6.5 kg) without batteries.

Numbered product overview 1 to 15: battery packs, speed selector button, handle shaft, switch, upper, middle and lower shaft sections, auxiliary handle, discharge direction control lever and guide, support wheel, belt cover, auger housing, auger and scraper bar.

What comes in the box

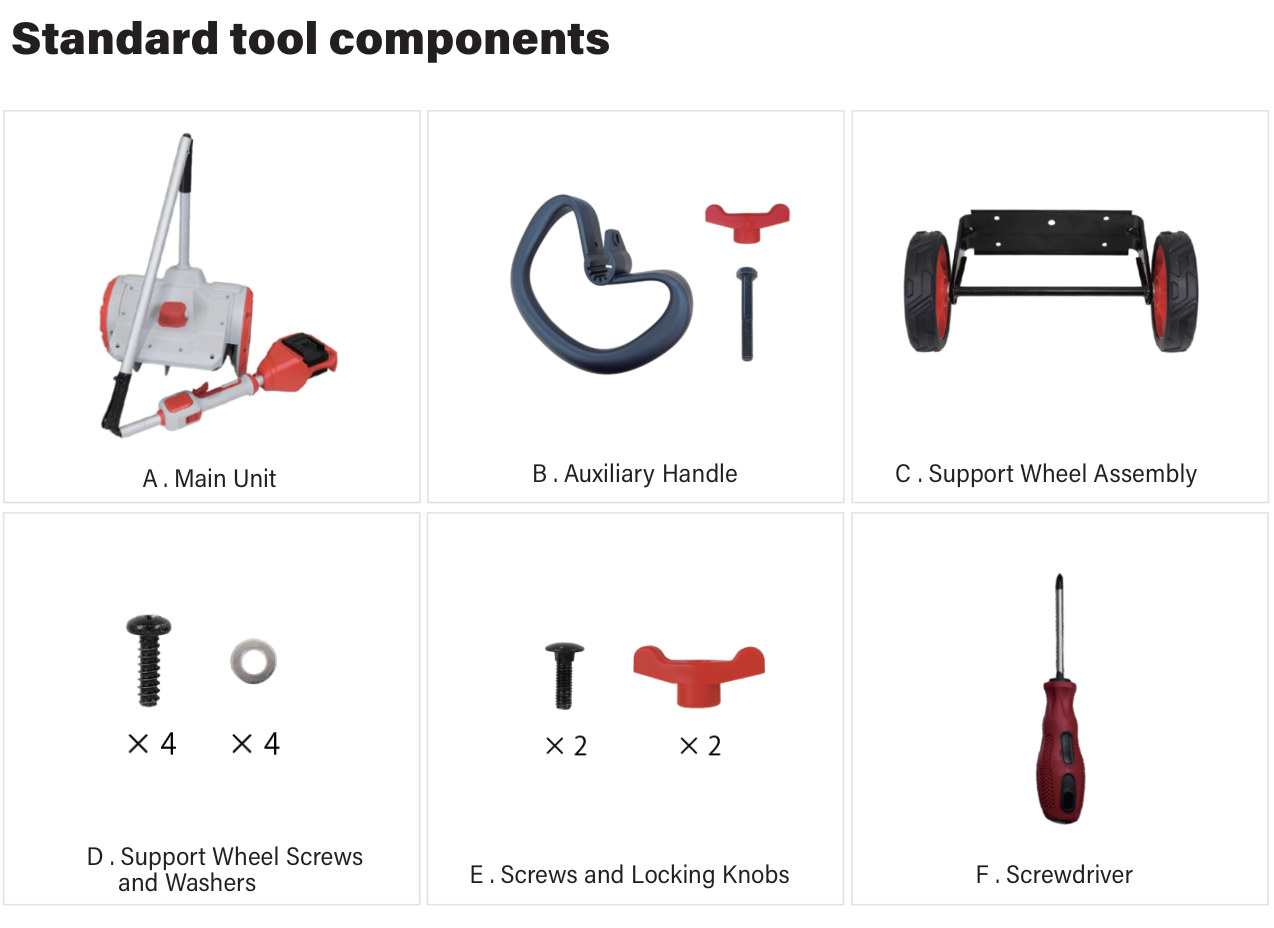
Unpack and check the main unit, the auxiliary handle with its knob bolt, the support wheel assembly with four screws and four washers, two screws and two locking knobs for the shaft connectors, and a screwdriver.

The battery and charger depend on the kit you ordered: tool only ships with neither, while the 20V 6.0Ah and 20V 8.0Ah kits each include two packs and a dual-port charger.

Keep the carton until every item is checked, and contact support before assembly if anything is missing or damaged.

Box contents A to F: main unit, auxiliary handle with knob bolt, support wheel assembly, four support wheel screws and washers, two screws and locking knobs, and a screwdriver.

Assemble the shaft

Remove both battery packs before assembly — with packs fitted the tool can start unexpectedly.

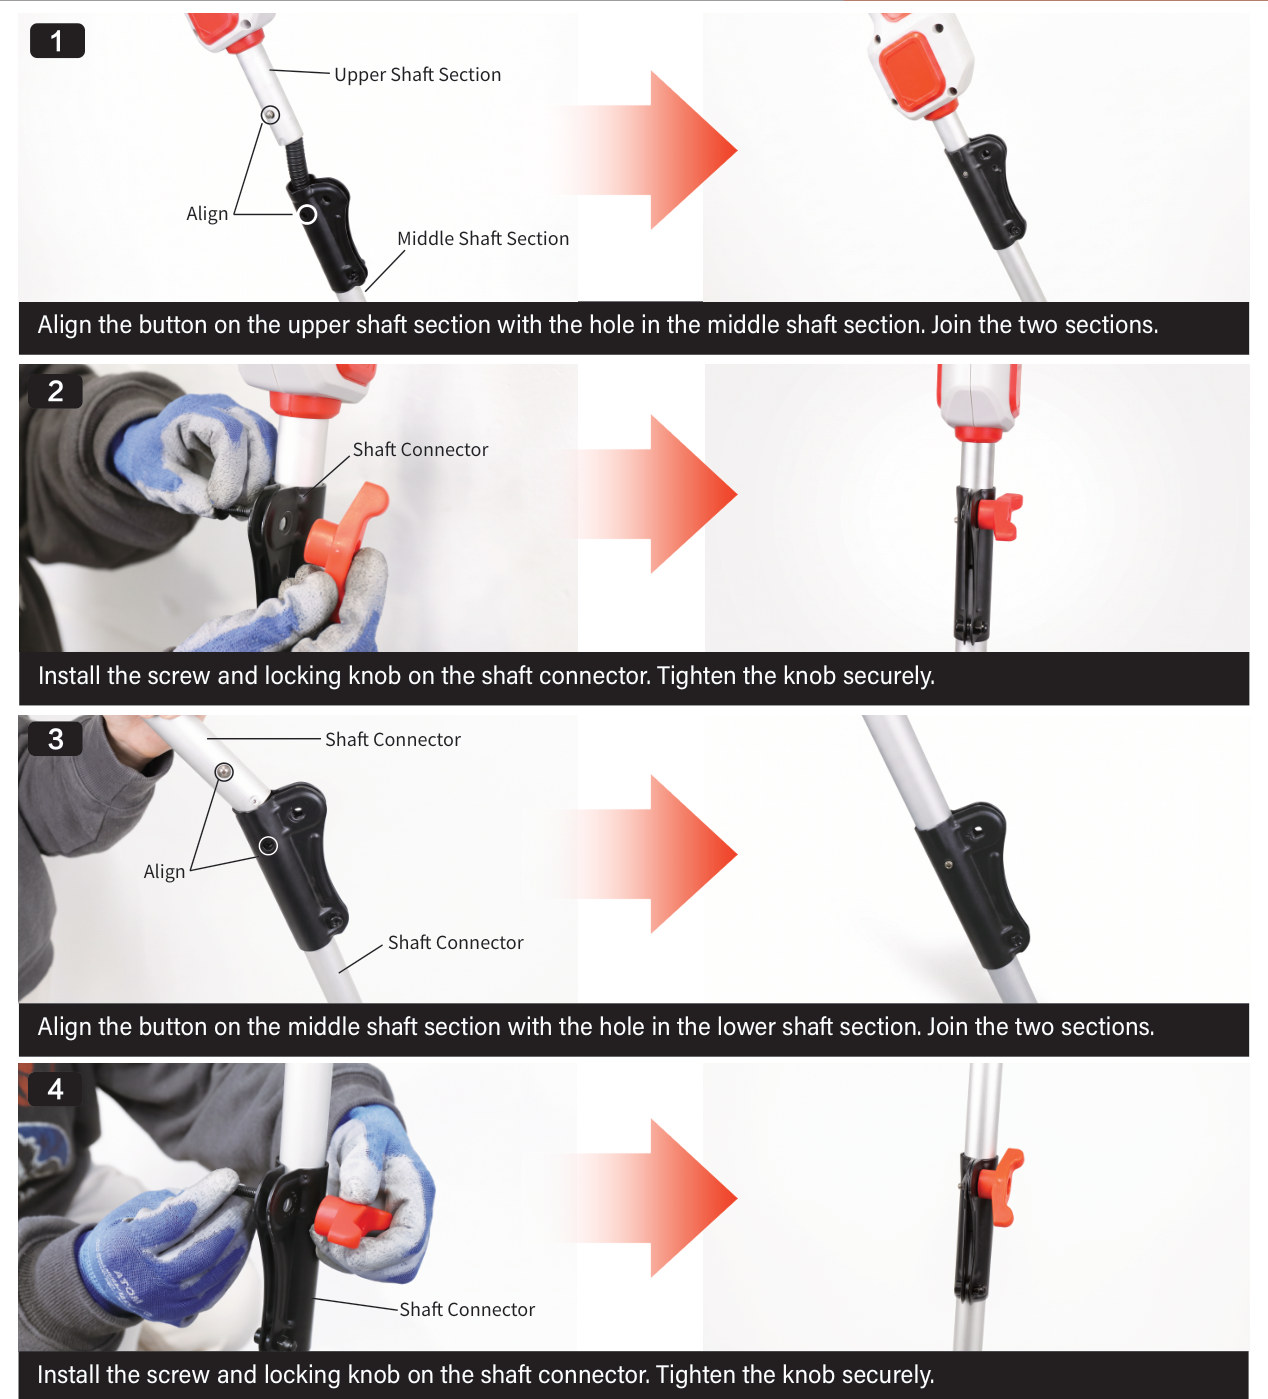
Join the upper shaft section to the middle section by aligning the button with the hole and pushing the sections together. Fit the screw and locking knob on the shaft connector and tighten the knob securely. Repeat for the middle and lower sections.

Keep the internal cable clear of every joint and fastener; a trapped cable can fail during operation and cut power unexpectedly.

Manual steps 1 to 4: align the button with the hole and join the upper and middle shaft sections, fit the screw and locking knob, then repeat for the middle and lower sections.

Fit the handle and wheels

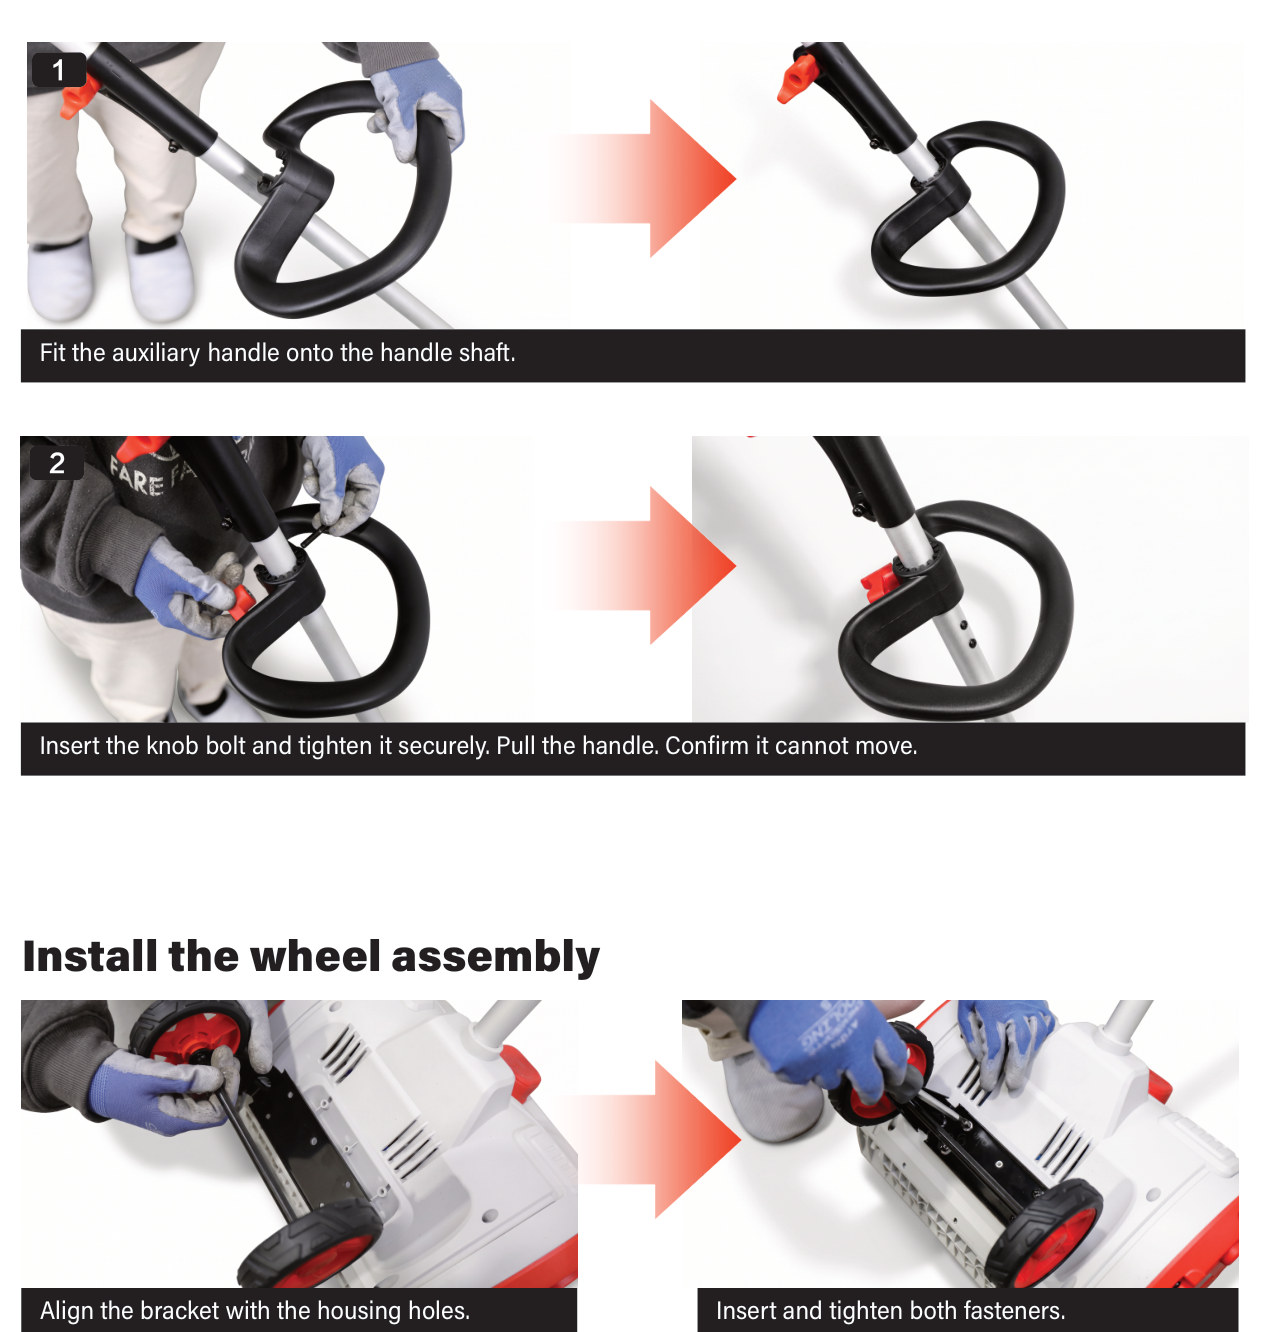
Slide the auxiliary handle onto the handle shaft, insert the knob bolt and tighten it. Pull the handle to confirm it cannot move.

Align the wheel bracket with the holes in the auger housing, insert both fasteners and tighten them. A loose handle or wheel bracket can shift and cost you balance or control, so retighten every fastener before each use.

Manual steps 1 and 2: fit the auxiliary handle onto the handle shaft and tighten the knob bolt. Then align the wheel bracket with the housing holes, insert both fasteners and tighten.

Fit the shoulder strap

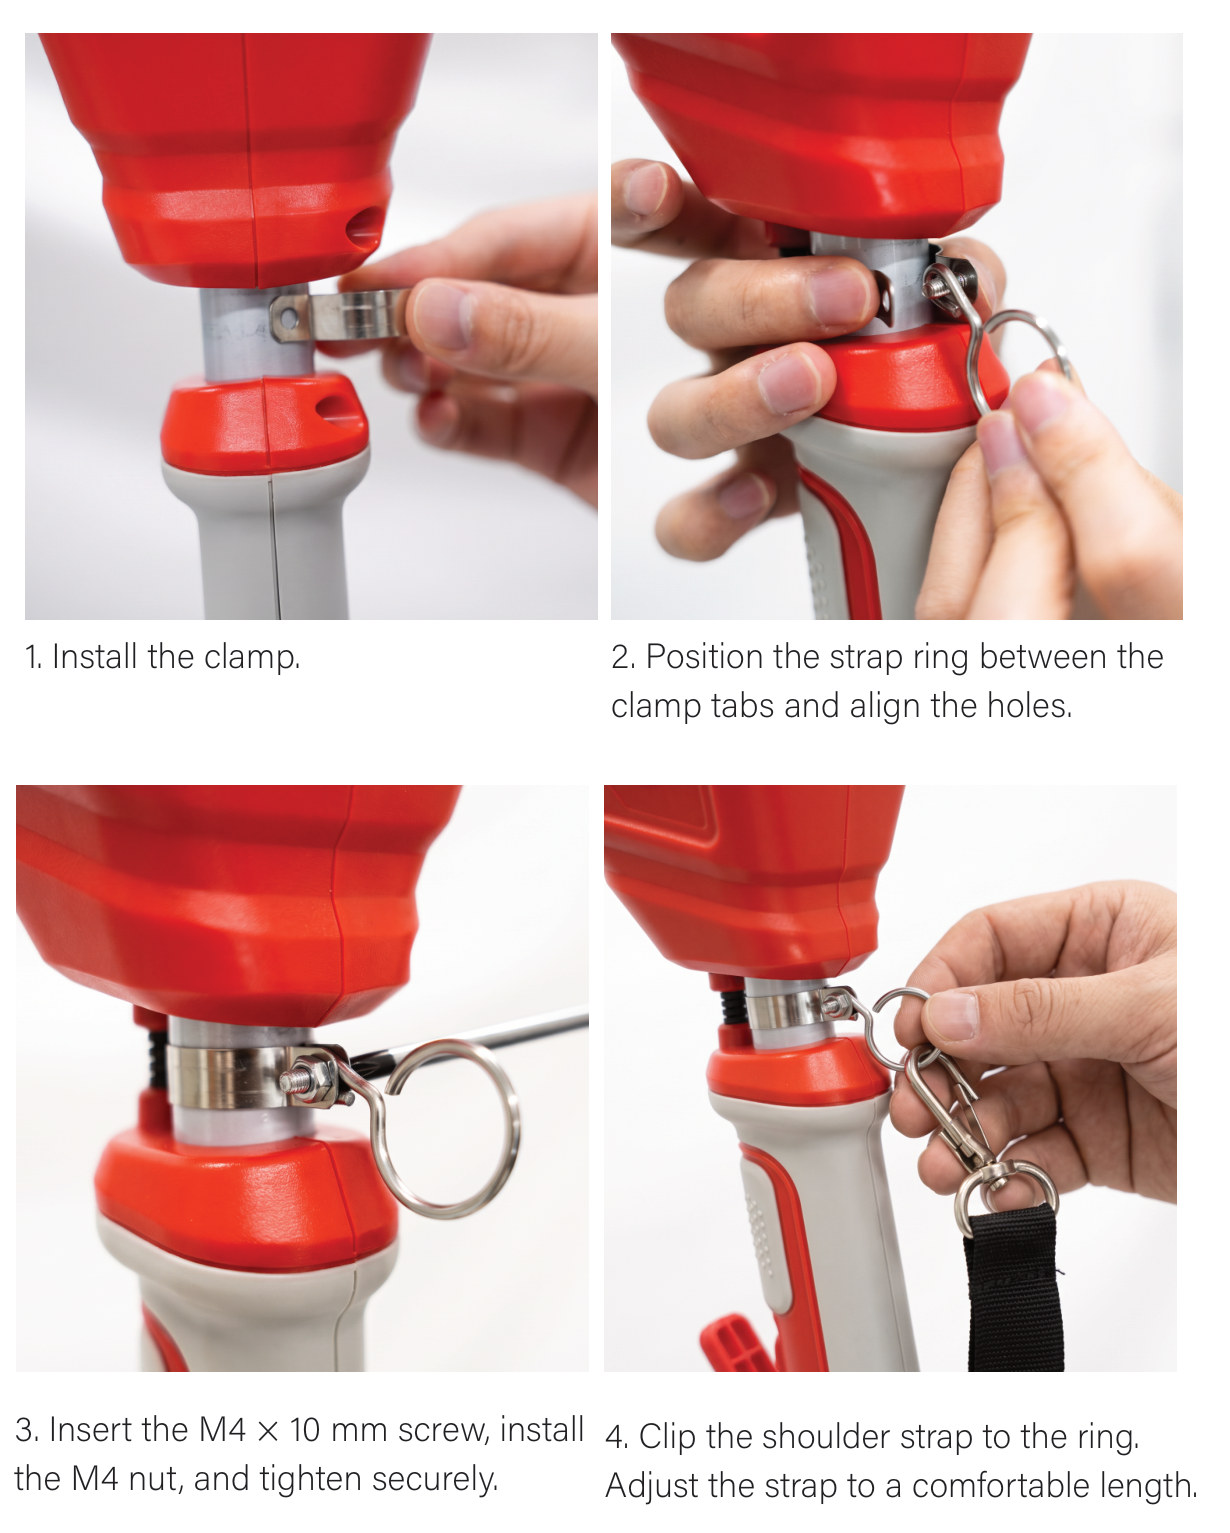
Fit the clamp around the handle, position the strap ring between the clamp tabs with the holes aligned, then insert the M4 × 10 mm screw, fit the M4 nut and tighten securely. Clip the shoulder strap to the ring and adjust it to a comfortable length.

Manual steps 1 to 4: install the clamp, position the strap ring between the clamp tabs, fit the M4 x 10 mm screw and nut, then clip the shoulder strap to the ring.

Charge both battery packs

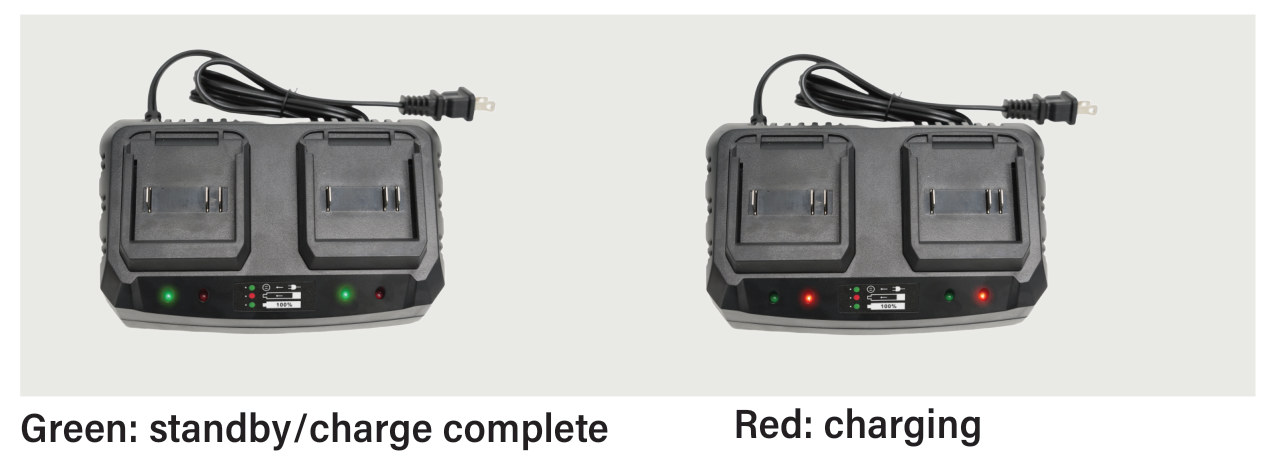
The packs are not fully charged when purchased. Plug the charger into a power outlet; the indicators light green in standby. Slide a pack fully into the charger along the guide rails and the indicator turns red, then green when charging is complete. Remove the pack and unplug the charger.

Press the pack's indicator button to check its charge. Four illuminated indicators mean roughly 65–100%, and a flashing light means recharge — the gauge does not necessarily show a full charge when all four are lit.

Charge at 41–105°F (5–40°C). Warmth during charging is normal. Do not recharge a fully charged pack or repeatedly drain a pack completely, recharge stored packs every six months, and never leave a depleted pack uncharged for three months.

Dual-port charger with green indicators for standby or charge complete and red indicators while charging.

Fit both packs and set the discharge direction

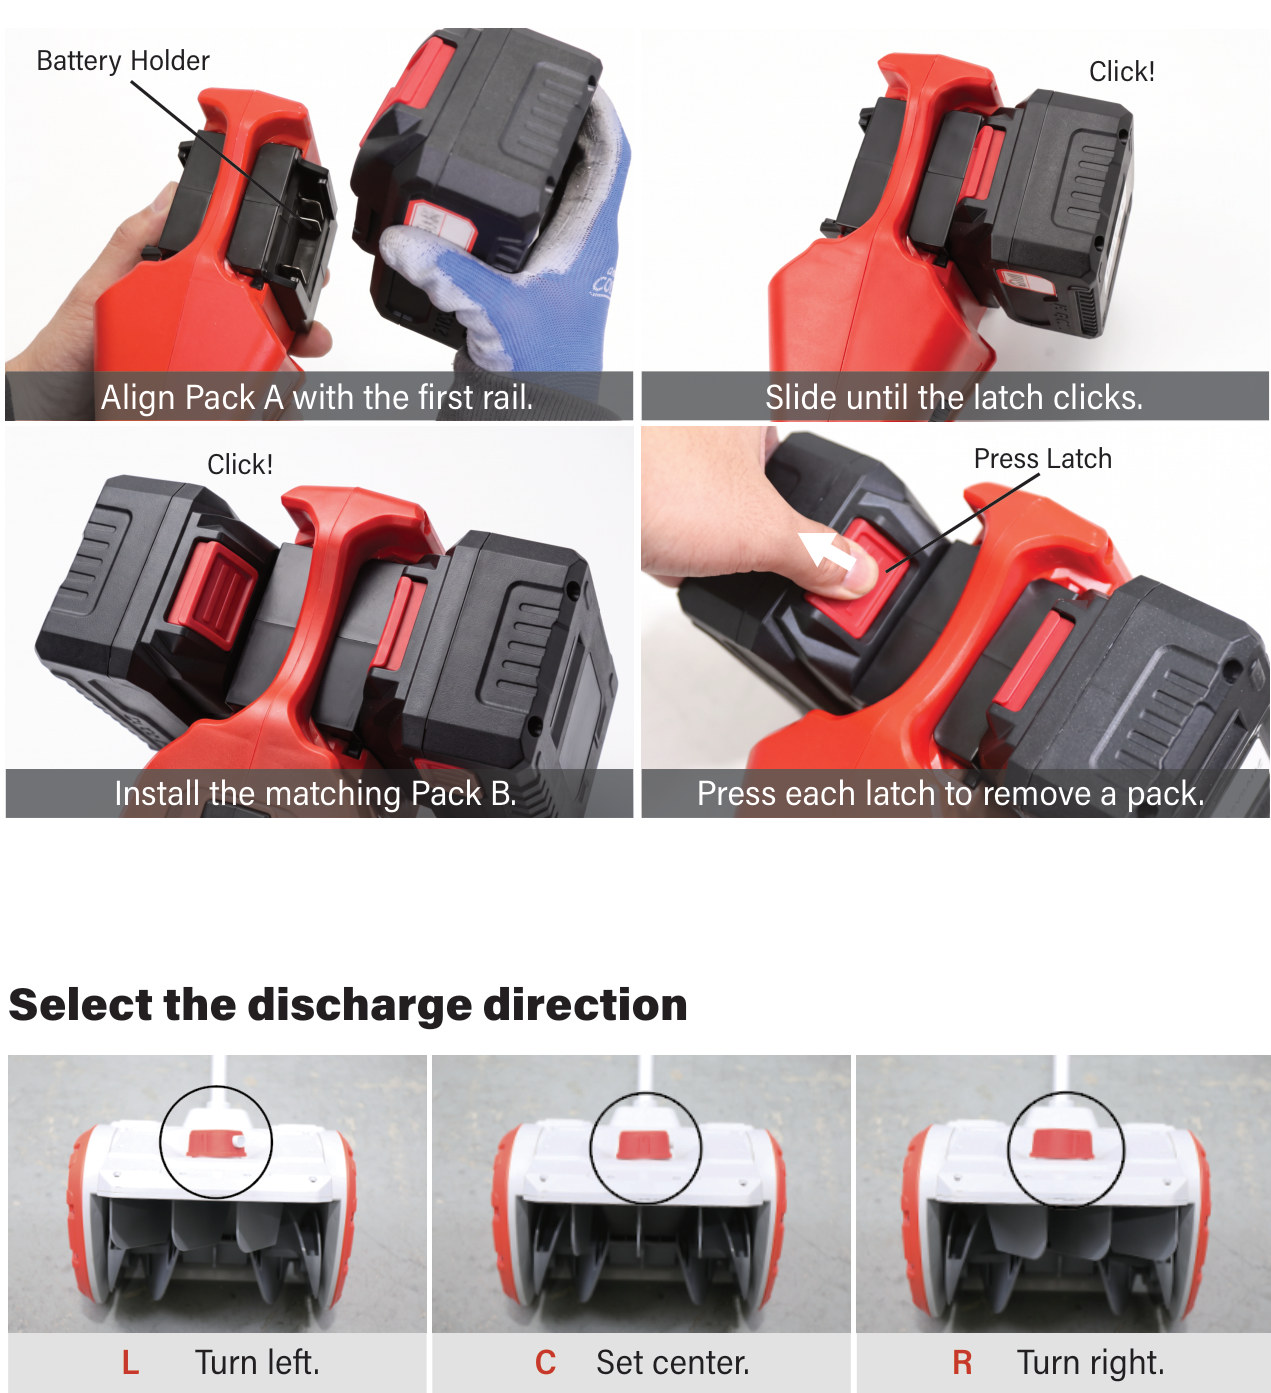
Open the battery cover, align the first pack with its rail and slide it in until the latch clicks. Fit the matching pack the same way — the shovel will not run on a single pack — and close the cover.

The red knob on the auger housing sets where the snow goes: turn it left for left discharge, centre for straight ahead and right for right discharge. Stop the tool before turning the knob.

Manual steps: align pack A with the first rail and slide until it clicks, fit the matching pack B, press each latch to remove a pack. Then set the discharge direction with the red knob: L for left, C for centre and R for right.

Before you start clearing

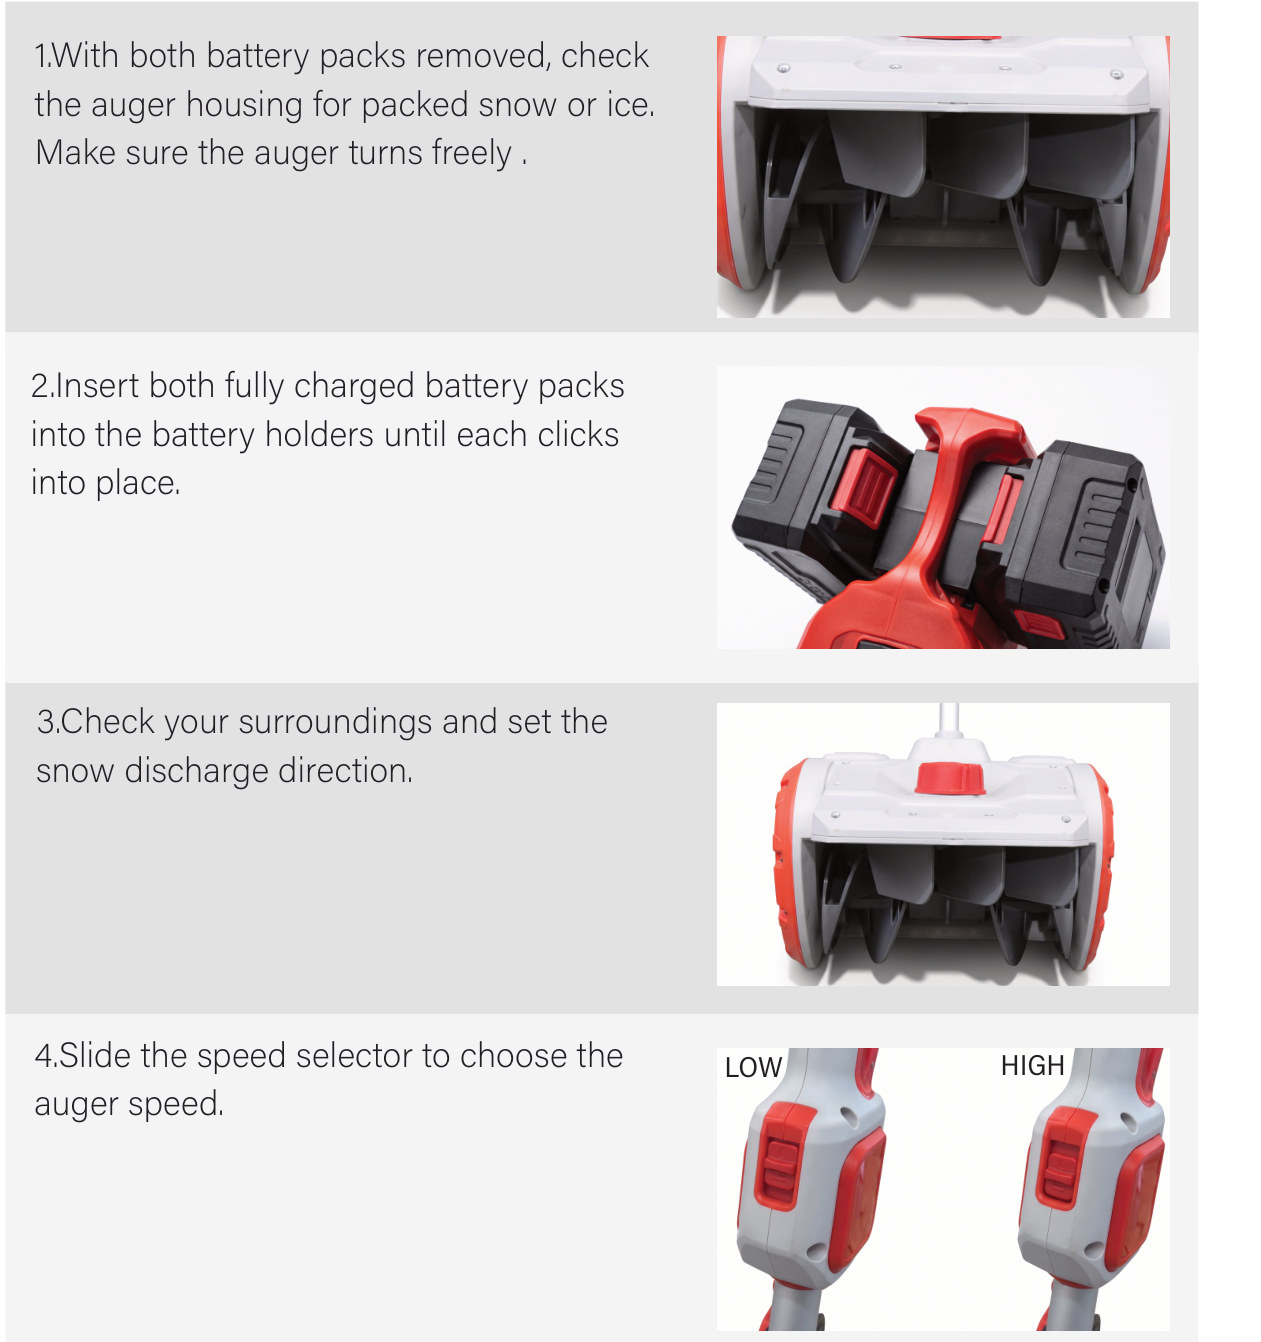
With both packs removed, check the auger housing for packed snow or ice and make sure the auger turns freely. Fit both fully charged packs until each clicks into place. Check your surroundings, set the discharge direction, and slide the speed selector to LOW or HIGH for the conditions.

Manual steps 1 to 4: check the auger housing with the packs removed, fit both charged packs, set the discharge direction, and choose LOW or HIGH auger speed.

Clear snow

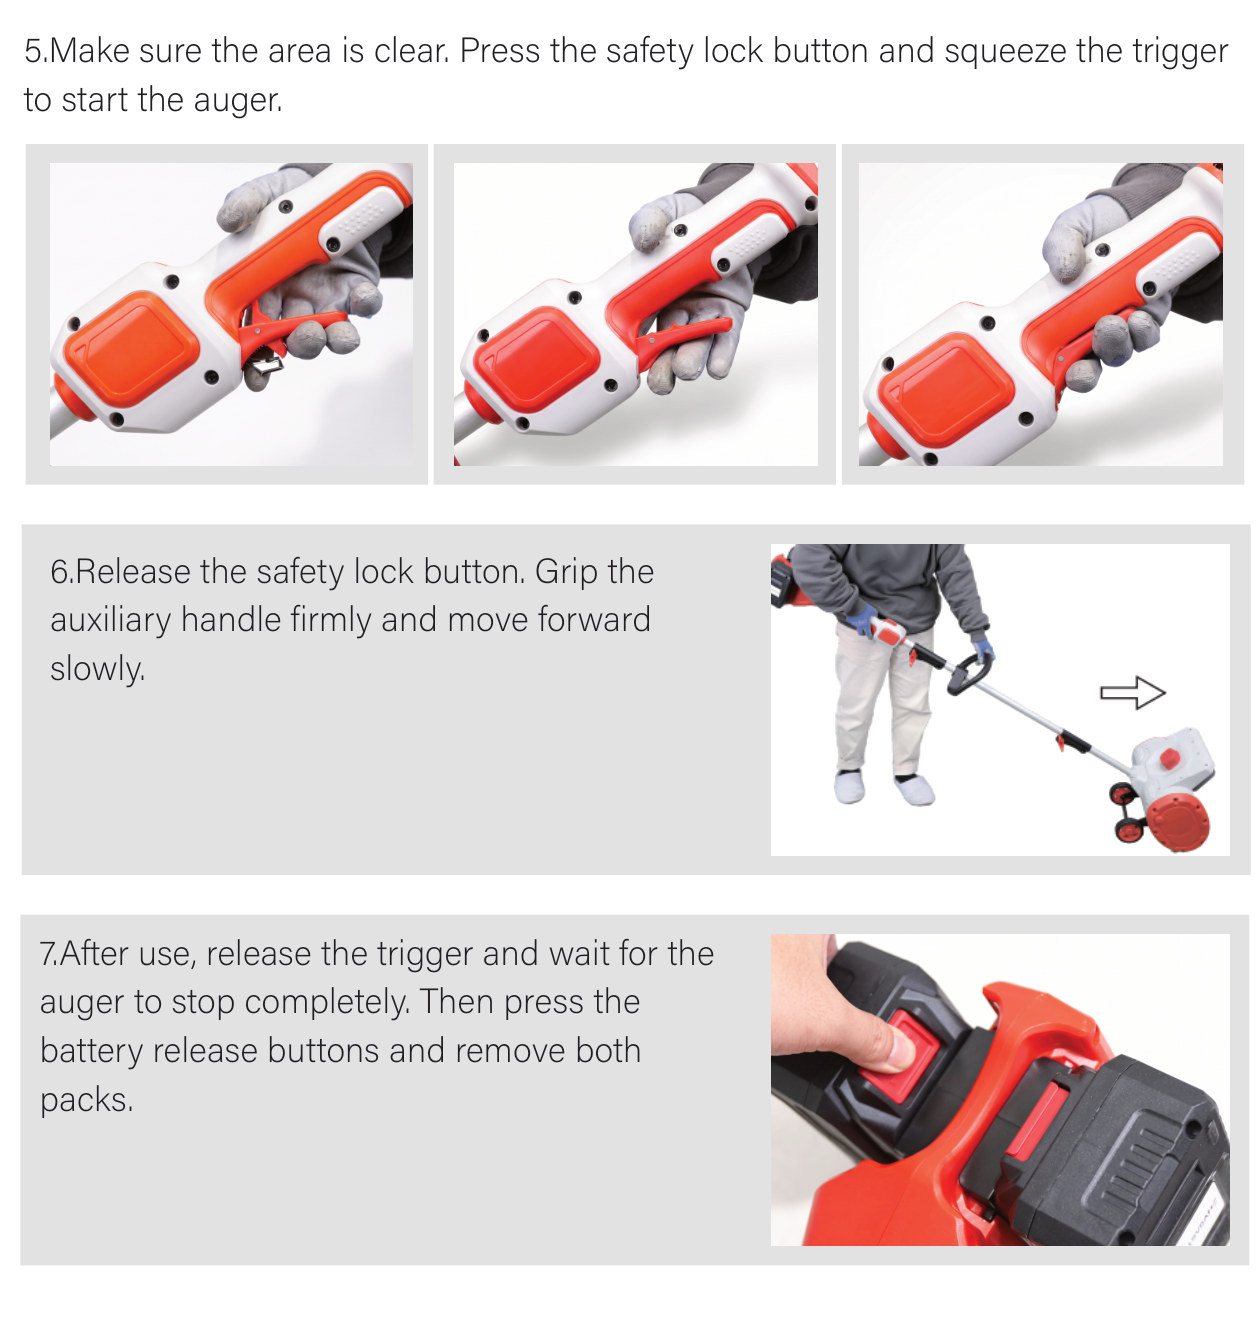
Make sure the area is clear, press the safety lock button and squeeze the trigger to start the auger. Release the safety lock button, grip the auxiliary handle firmly and move forward slowly; pushing too fast overloads the motor.

Do not start the tool with the auger pressed against the snow. Start the auger first, then move slowly into the snow.

After use, release the trigger and wait for the auger to stop completely before pressing the battery release buttons and removing both packs. The auger may coast after the trigger is released.

Manual steps 5 to 7: press the safety lock button and squeeze the trigger to start, release the lock button and move forward slowly, then release the trigger and remove both packs after the auger stops.

Clear a clog safely

Never clear the auger with your hands. Stored or residual motion can amputate fingers — use only a non-metallic clean-out tool.

Release the trigger and wait for all motion to stop. Remove both battery packs, wait at least 10 seconds, then clear the housing. Inspect the auger and housing for damage, and refit the packs only after clearing the area.

Clean, store and recycle

Remove both packs, brush away snow, ice and debris, wipe surfaces with a soft damp cloth, and keep vents and battery contacts clean and dry. Never spray, hose or immerse the tool, and never use gasoline, solvents or harsh cleaners.

Dry the tool completely, inspect the fasteners, guards, auger and scraper, and store it indoors in a locked, ventilated area. Store the packs separately at about 40% charge, and check them at least every three months.

For transport, remove the packs, protect the terminals from metal and short circuits, use the original packaging when possible, and never ship a damaged, swollen or leaking pack. Never put battery packs in household trash or curbside recycling: tape exposed terminals with non-conductive tape and bag each pack individually when required.

Troubleshooting

If the shovel will not start, check that both packs are fitted and locked, that they are matched packs, and start with the safety lock button first, then the trigger. If it stops during use, the machine is overloaded or hot: release the trigger, clear the load and let the packs cool.

If clearing is poor, slow down, clear the clog and inspect the scraper. If runtime is short, charge the packs and warm them indoors. If vibration is abnormal, stop, remove the packs and clear debris; if it continues, contact support. If the charger reports a fault, reseat the packs and confirm the temperature range.

Unsafe repairs can defeat protective systems. Stop using the tool and contact qualified service personnel if a problem persists.

Specifications

The model is QS-ESS20W12: a 40V (20V + 20V) brushless machine with a 1,000 W motor and 2,000 ±10% rpm no-load speed. It clears 12 in. (305 mm) wide and 6 in. (150 mm) deep, throws snow up to 23 ft (7 m), and discharges left, centre or right at 32.5°. It weighs 14.3 lb (6.5 kg) without batteries, and measures approximately 66.7 × 14.5 × 13.4 in. (1,720 × 370 × 340 mm).

Use two approved 20V 6.0Ah or 20V 8.0Ah packs of the same model and capacity, matched in charge level. These are approximate values that vary with operating conditions and battery condition; specifications may change without notice.

Shop the 12-inch snow shovel

Scroll to Top